All posts by victoriapavlov

Digital Artist and Photographer

Digital Painting Made Easy with The Mixer Brush Tool in Adobe Photoshop

Victoria Pavlov Studio

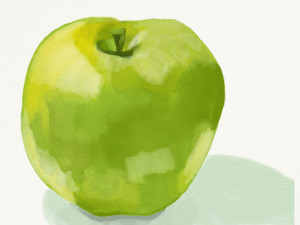
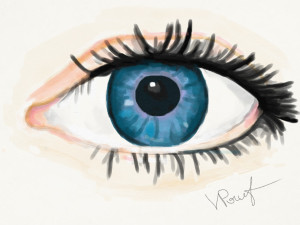
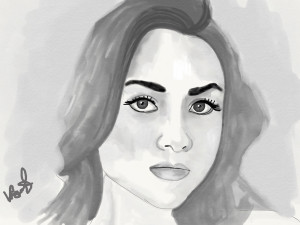
My favorite and primary tool in my digital painting is the Mixer Brush Tool in Adobe Photoshop CC.

I have two styles in my digital painting:
Painting for Photographers (you don’t need to have any painting experience)
Painting from Scratch (you need to have painting experience or you need to be willing to learn how to paint 🙂  )


For the last few days I have received many questions about my favorite technique using the Mixer Brush Tool (digital painting for photographers)

My favorite technique:
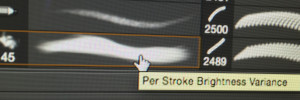
Favorite Brush: Per Stroke Brightness Variance
Preset: Custom
Load Brush after Each Stoke ( clean brush after each stroke)

brush

Screen Shot 2015-09-17 at 10.38.30 AM

Painted with Adobe Photoshop CC & wacom

Victoria Pavlov Studio


Life is Good – Vicky Ryder

Life is Good

Life is Good – Vicky Ryder

Last week I had the pleasure of photographing Vicky Ryder (for my Life is Good series)  who had celebrated her 10th year of being free of cancer. I met Vicky about 15 months ago and I must say that she is one of the most beautiful human beings inside and out.  I asked Vicky to share her story with us. And this is what she said:

The day after these photos were taken marked exactly 10 years since a lung biopsy revealed a malignant carcinoid tumor in my right center lung lobe. Two weeks later, I had the entire lobe surgically removed.

I am a strong believer in positive thinking and fighting through hard times. In spite of severe pain, and a ton of post-operative equipment I won’t even start to describe, I was taking laps around the hospital floor in record time. I wanted out of there.

Fortunately, my coding job allowed me to work remotely. I was back to work as soon as I could sit up, even though I had short term disability left over.

As heroic as that all seemed to people at the time, it was not without its struggles. 

Having never experienced any major medical issues prior to that year, I felt like “damaged goods” for quite awhile. With a surgical wound spanning from just under the right breast all the way to my back, I had only two positions I could comfortably assume. My ribs had been sawed through, so I couldn’t get out of bed without tears from the pain. I couldn’t breathe without discomfort. I needed help to get through even the most embarrassing daily tasks. I certainly couldn’t drive for a long time. Up until this point, I had been an exceptionally independent woman. Needless to say, I suffered bouts of depression.

Little is known about the cause of carcinoid tumors. All the doctors could tell me is that it probably was not caused by any of the usual suspects, or more people would have them. Carcinoid tumors are relatively rare. For awhile, I was paranoid of everything from candles to traffic fumes. 

Though I was back to a somewhat normal routine after a few months, it was around a year before I felt normal. By that, I mean I had assimilated enough that a day went by where I wasn’t reminded of all the ways life had changed. 

Throughout that year, I resolved to only let it change me for the better. I remembered that worrying about the unknown was no way to live life, and I started to truly appreciate what I had vs. lament what I didn’t. I had loved ones to help me through it all. I had a supportive job. Apart from annual CT scans, I needed no followup treatment. Most importantly, I was lucky to have caught it early. 

At five years out, I was officially considered a cancer survivor.

Fast forward 10 years. The two remaining right lung lobes expanded to fill in for the missing third. I can breathe better and do more than I could for several years prior. Most importantly, I’m alive. I’ve taken life head-on by changing careers in an attempt to be sure I spend my remaining time on Earth doing things I love.

This isn’t to say the last 10 years have been perfect. Believe it or not, I’ve been through even more trying times with my health. Life, in general, has surely had its ups and downs. I have just learned to take it all in and build a new kind of strength upon it. I do my best to share that strength with others in every way possible. 

I typically only speak of my experiences with cancer to those who are in need of the same moral support I was so lucky to enjoy. When I realized I would be in Victoria’s neighborhood precisely 10 years to the day of my cancer diagnosis, I knew it was time to do a bit better than that. I hope all who read this will see that, above all

Life Is Good.

Life is Good

Life is Good

Why Apple Music is Good for Me

A big influence and inspiration for me as a digital artist is music. I LOVE music and I always inspired by it. As I am always saying ” music is the strings of an artist soul”.  I can’t listen to the same melody/song over and over, day by day (yes, I have my music library with music I can listen to over and over, year by year) but I need a “new” song every day. I love classical, pop and many other styles and until Apple introduced Apple Music I would struggle with my music library (Can you imagine having to buy new music ever day? Yes, impossible). And now I am very happy: I can have just about ANY song by ANY artist at any time, I can follow my favorite artists, I can add songs to my playlist(s), share song/album, and make them available offline, buy my favorite song/album, and  I have my favorite radio stations. After some period of time Apple is learning what I love and suggesting music for me (based on the song/album I added to my Favorites). All are available on any of my devices: iPhone, iMac, MacBook Pro, Apple Watch, or iPad. And the best part: any membership plan is MUCH cheaper than the one or two albums I used to buy an every month (and first 3 months of your membership is free). And I did not mention about teenagers. ALL teenagers are music fans and they need more and more and more music every day! For families with more than one child sometimes it is very problematic to give them all music they want. Now with the Apple Music Family Plan you can do it! For any one who really loves music, Apple Music is the best and the right place for all your needs. Apple Music is Good for me and it’s GREAT with the Family Plan.
My Favorite Scanner App is Scanner Pro

One of my favorite business apps is Scanner Pro by Readdle . With Scanner Pro I can scan any document, paper, receipts, or just an image and save or share it using my mobile device. A great app for just $2.99!!!!

When you first login to your app the welcome screen will ask you to join. Simply enter your email address and now you are ready to turn your mobile device to portable scanner.
IMG_5720

I am always using the manual scanning option for accurate edge adjustments after scanning.

IMG_5721

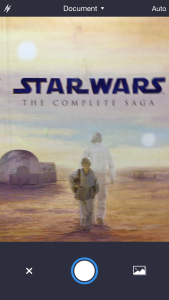
Take a Picture of your paper, document, images you want to scan  (also you can scan  from your Camera Roll )

IMG_5723

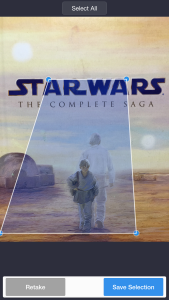
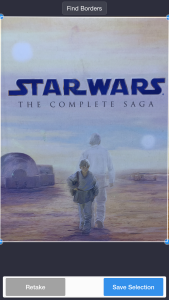
And now you can manually adjust edges of your scan to fix the persepective

IMG_5724

IMG_5725

Now you have MANY options to share your scanned document

IMG_5726 IMG_5727


Also you have MANY different choices to upload your document to cloud services like Dropbox, Google Drive, OneDrive and more!

IMG_5728

IMG_5729

With Scanner Pro it doesn’t matter where I am. I don’t need to be at my office to scan a document. My mobile device is my pocket scanner now!


Black & White with Adobe Lightroom CC

Photoshop Tutorial

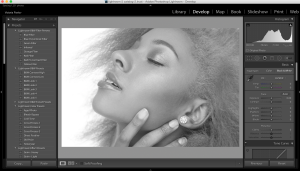
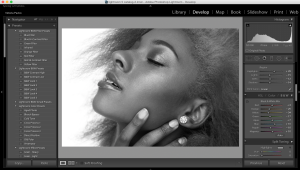
Today I will show you how to create a Black & White image in Adobe Lightroom in only 3 steps

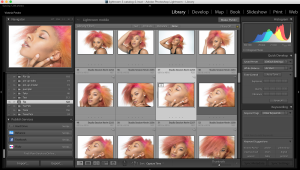
Select the image you want to work with
Screen Shot 2015-08-25 at 8.00.24 AM

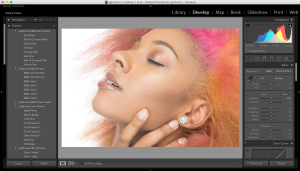
Switch to the Develop Module
Screen Shot 2015-08-25 at 8.02.36 AM

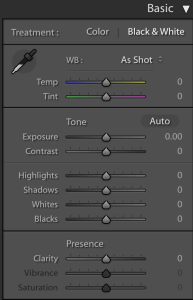
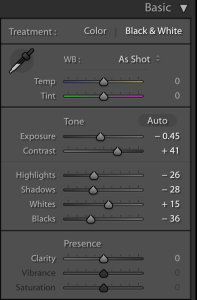
1: Choose Black & White from the Basic panel
Screen Shot 2015-08-25 at 8.03.39 AM

Screen Shot 2015-08-25 at 8.04.19 AM

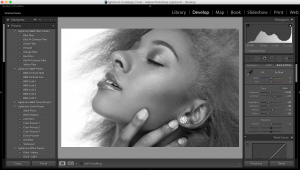
Adjust the sliders to get the look you want or use mine below
Screen Shot 2015-08-25 at 8.05.35 AM Screen Shot 2015-08-25 at 8.06.31 AM


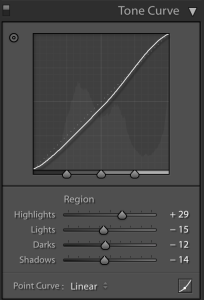
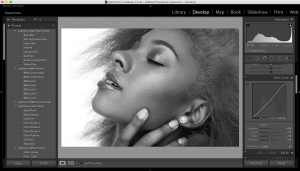
2: Using Tone Curve panel change numbers of each slider ( Highlights, Lights, Dark, Shadows )
Screen Shot 2015-08-25 at 8.07.58 AM Screen Shot 2015-08-25 at 8.08.06 AM


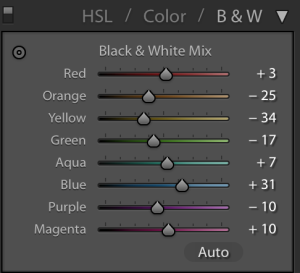
3: Change numbers of each B & W slider (it will depend of your image)

Screen Shot 2015-08-25 at 8.11.28 AM Screen Shot 2015-08-25 at 8.11.39 AM


Fotolia
 

Life is Good Series

I am very excited to show you the results from  the first session of  my ” Life is Good’ series. This series is VERY important and personal to me. Life is Good is series of the cancer survivors and cancer patients  images. With my series of images  I want to show how GREAT  life is. I want to show how strong people are. I am not looking for models for my series (unless the model is a cancer survivor or cancer patient). I am looking for REAL people to show various emotions, to show that every day is gift and that we all should remember that  kindness is free. Just a few minutes of your support could save and help someone’s life. All of us could help with the cancer research, donate your time to support the people who are  fighting cancer now.

I am an artist and I truly believe  (and I know it is based on my own experience) in healing power of art. I started the series “Life is Good” using my favorite tools: Nikon camera ,Westcott lighting, Adobe Photoshop, Adobe Lightroom , Wacom, and my Mixer brush Tool. All my sessions from that series are FREE and I would truly appreciate  if any of you could spread the word to let cancer survivors  and cancer patients know about it.

And now let me introduce my first image:

Justyna Krolkiewicz:
amazing human being, model and a cancer survivor. 

Portrait Portrait Portrait

Fotolia

Create Black and White image in 3 steps

Photoshop Tutorial

Today I will show you how to create black & white image in 3 steps using Adjustments Layers in Adobe Photoshop CC

Open your image you want to work with
Screen Shot 2015-08-25 at 7.35.45 AM

1: Adjustments > Black and White
Screen Shot 2015-08-25 at 7.36.57 AM
Using the black slider of each to the right/left you will  modify influence of the colors  in the resulting of black & white image.

Screen Shot 2015-08-25 at 7.41.58 AM

Screen Shot 2015-08-25 at 7.42.05 AM

Screen Shot 2015-08-25 at 7.42.16 AM

2: Highlight t your image layer ( Layer 1 )  > Adjustments > Selective Color
Screen Shot 2015-08-25 at 7.44.33 AM

Screen Shot 2015-08-25 at 7.45.16 AM

Change number of the black slider of each color ( move the slider to the left or right)

Screen Shot 2015-08-25 at 7.47.43 AM

Screen Shot 2015-08-25 at 7.49.07 AM


3: Adjustments > Color Lookup >2Strip.look from the 3DLUT File ( selected by default )

Screen Shot 2015-08-25 at 7.50.15 AM

Screen Shot 2015-08-25 at 7.52.16 AM

Screen Shot 2015-08-25 at 7.52.25 AM


Fotolia


5 reasons to use Adobe Stock

Painted with Adobe Photoshop CC and Wacom

I was looking for stock images for a many years and I was not impressed with what I could see on a market  until I was introduced to Adobe Stock.

I am professional photographer, digital artist, and educator. I am working and teaching  Adobe Photoshop, Adobe Muse, Adobe Dreamweaver, Adobe Premiere Pro, Adobe Lightroom, and all Adobe mobile applications and I found that Adobe Stock is the BEST source for my design, photography, painting, education workflow. Why?

Reason 1:
I’ve heard many people say: ” I am a professional photographer, designer and I am not using any stock images”. Hmmmm so if you need any professional  image, background, graphic image to build your clients “travel with us” website you will go around the world to take pictures of the places were your client offers services? And keep in mind that as usual our clients don’t know what image(s) they will use and they are depending on us to show them at least a few examples that they can choose from. So if you multiply all the costs of traveling around the world, and the time just to take pictures, your price for client’s website will rise up significantly and I am not talking about the extra time that you need to build the website. My question is: will your client wait at least 7 extra months and pay 99% more than he/ she should pay just to let you use your own images? The answer is NO and NEVER.
So reason #1: use Adobe Stock images to make your workflow more productive along with building great communication between you and your client.

Reason 2:
When you working on your client project and you’re not sure which image you or your client  will use with your design, simply download a “preview” version of the image(s) your want to use, finish your design, project, show it to your client and if your client approves your design simply click on Adobe Stock image > License image and you will visually see  that your Preview image will be replaced with high resolution, ready to use royalty free image. You don’t need to do any EXTRA steps that will increase your workflow time and your client will receive the final copy of the approved project in no time!
So reason 2: Fast and stress free workflow

Reason 3:
Quality
Adobe Stock is a worldwide library (40 million +) of the best photographers, digital artists, designers.  All images are with HIGH quality ready to use right away.

Reason 4:
The price
You have many optiosn to subscribe to Adobe Stock
1: As a Creative Cloud member you are saving 40% of the monthly plan!!!!!!
10 images a month
US $29.99 / mo
Annual plan, paid monthly

  • Add to a Creative Cloud subscription
  • Additional images at US$2.99
  • Rollover up to 120 images

2: 10 Images a month
US $49.99/mo
Monthly plan

  • Additional images at US$4.99
  • Rollover up to 120 images

3: 750 images a month

US $199.99/mo
Annual plan, paid monthly
  • Additional images at US$0.99

4: Single images are just US $9.99 without a subscription

Reason 5:
If you are a photographer, digital artist, 3D artist, graphic designer you can make money selling your work. You can sell your images, even the ones taken with your smart phone!! You can make money from your work just from your home using your computer!


ParticleShop Plugin for Adobe Photoshop

Geisha

ParticleShop is a brush plugin for Adobe Photoshop.

I was introduced to ParticleShop the brush plugin for Adobe Photoshop at Photoshop World 2015. I liked the demo and I decided to buy and try this plugin ( You can download the trial version to try first).

First of  all I want to point  out that if you are looking for a great painting plugin this in NOT your plugin. I can’t imagine using this plugin for my type of painting. My primary and one and only application for my all digital painting work is Adobe Photoshop CC and most of the time I am using the Mixer Brush Tool. Also I am using Adobe Sketch ( Adobe mobile drawing application) as well. So if you will ask me what is the best application for a digital painting I will answer: The ONE and ONLY Adobe Photoshop CC.

I am not using any third party plugins.   As an  Adobe Creative Cloud subscriber the main and primary reason for  me to use ParticleShop plugin is that this plugin is works with the newest version of Adobe Photoshop CC 2015 and the one one license you purchase will be installed for Adobe Photoshop CC  and Adobe Lightroom as well.

Screen Shot 2015-08-16 at 1.53.28 PM

The ParticleShop plugin is a great plugin for any type of artistic retouching. It’s amazing with hair and high fashion retouching, and if you like to apply any effects to your image you’ll probably like it. Because ParticleShop is the brush plugin for Adobe Photoshop you have access to all powerful Adobe Photoshop futures, including layers and if combine the plugin with other Photoshop features you will create a very powerful image. With the ParticleShop plugin you have control over your image, you can control the brush strokes:  light, color, and angle. You can apply multiple brush(es) effects in one image. Combine, change the  color,  and opacity of the brush. You can apply brush strokes effects and return to Photoshop and apply the layer mask, duplicate the layer and continue your workflow using Adobe Photoshop. If after that you want to  return to ParticleShop you can do it at any time.

I like the plugin and will use it for sure with my design and art workflow.
I have only two complaints about the Starter Pack Options:

Screen Shot 2015-08-16 at 1.53.05 PM
1: I wish I had at least two different types of each default brushes.
You can buy additional brush packs for $29.99 each but I am not sure I will spend $29.99 for each brush pack (each plugin has 11 brushes and  so it would be 11 packs) just after I spent $49.99 for the plugin. If I would have at least two different combinations  of each brush as a Starter Pack Options I would feel much better.
2: I had trouble making some of my brushes big enough for my image ( 6016 x 4016 ) even after I made  the Brush size by Maximum = 750 ( Starter Pack Options)
Screen Shot 2015-08-16 at 2.02.41 PM

Screen Shot 2015-08-16 at 1.52.53 PM

Geisha

Before

Geisha

After


Fotolia
 

Image Manipulation with Adobe Photoshop CC

In this tutorial I will show how to create romantic and elegant image using Dollar Photo Club  images

1: Open your first image and this image will be our background image
Screen Shot 2015-07-28 at 8.12.20 AM

2: Open your Dragon image.
Screen Shot 2015-07-28 at 8.14.03 AM

3: Unlock the Dragon’s  background layer ( click on a lock icon )

4: Remove the white background ( you can use any method you are comfortable with ). I used the Magic Eraser Tool
Screen Shot 2015-07-28 at 8.20.56 AM

5: Select > All > Edit > Copy
Return to your background image > Edit > Paste
Screen Shot 2015-07-28 at 8.23.39 AM

6: Highlight the background layer > Click on the lock icon to unlock the layer  > Edit > Free Transform > Resize your background layer
Screen Shot 2015-07-28 at 8.26.58 AM

Screen Shot 2015-07-28 at 8.27.45 AM

7: Adjustments > Exposure
Screen Shot 2015-07-28 at 8.29.27 AM
Screen Shot 2015-07-28 at 8.29.35 AM
Screen Shot 2015-07-28 at 8.31.15 AM
Screen Shot 2015-07-28 at 8.31.24 AM

8: Highlight the Dragon Layer > Edit > Free Transform > Resize and change position of your Dragon
Screen Shot 2015-07-28 at 8.34.03 AM Screen Shot 2015-07-28 at 8.34.11 AM

9: Adjustments > Exposure > Click on Clip to Layer to affect only the layers below  ( your Dragon Layer)
Screen Shot 2015-07-28 at 8.36.28 AM Screen Shot 2015-07-28 at 8.36.43 AM

10: Click on your Dragon Layer > Dodge Tool > Highlight some parts of the Dragon’s skin
Screen Shot 2015-07-28 at 8.50.18 AM

11: Add empty layer bellow the Dragon’s Layer
Screen Shot 2015-07-28 at 8.51.40 AM

12: Using the brush tool with black color paint the area under the Dragon to apply shadow
Screen Shot 2015-07-28 at 8.53.15 AM

13: Filter > Blur > Gaussian Blur > Set the Layer Opacity = 91%

Screen Shot 2015-07-28 at 8.54.55 AM Screen Shot 2015-07-28 at 8.55.50 AM
Screen Shot 2015-07-28 at 8.56.25 AM

14: Highlight the Dragon Layer > Right Click  > Convert to  Smart Object > Merge Down >  Add  Layer Mask > Erase some parts of your Dragon to apply more realistic effect

Screen Shot 2015-07-28 at 9.05.38 AM

15: Layer > Merge Visible
Screen Shot 2015-07-28 at 9.40.56 AM

16: Adjustments > Exposure
Screen Shot 2015-07-28 at 9.43.34 AM

17: Adjustments > Color Lookup  > FallColors.Look

Screen Shot 2015-07-28 at 9.47.28 AM
Screen Shot 2015-07-28 at 9.48.14 AM

18: Create a new Layer > Rectangle  Tool with the White color on it

Screen Shot 2015-07-28 at 9.50.48 AM

19: Edit > Transform Path > Distort
Screen Shot 2015-07-28 at 9.52.48 AM

20: Set a Layer opacity = 37%
Screen Shot 2015-07-28 at 9.54.46 AM

21: Add layer mask > Using Gradient Tool erase ages of your shape
Screen Shot 2015-07-28 at 9.57.08 AM
Screen Shot 2015-07-28 at 9.58.02 AM

22: Duplicate Restangle 1 Layer

Screen Shot 2015-07-28 at 9.59.23 AM

23: Edit > Free Transform

Screen Shot 2015-07-28 at 10.00.54 AM

24: Merge Visible Layers  > Duplicate your layer > Filter > Render > Lens Flare

Screen Shot 2015-07-28 at 10.04.35 AM Screen Shot 2015-07-28 at 10.04.45 AM

25: Set the top layer opacity = 75%  > Add layer mask > Using Gradient Tool erase the lens flare effect from the ages of your layer
Screen Shot 2015-07-28 at 10.07.02 AM
Screen Shot 2015-07-28 at 10.07.34 AM

26: Adjustments > Curves

Screen Shot 2015-07-28 at 10.09.10 AM

27: Your images is ready
The Dragon


Fotolia